After you’ve identified the individual leads, please proceed
with the following steps to install the OmniJoin adaptor:
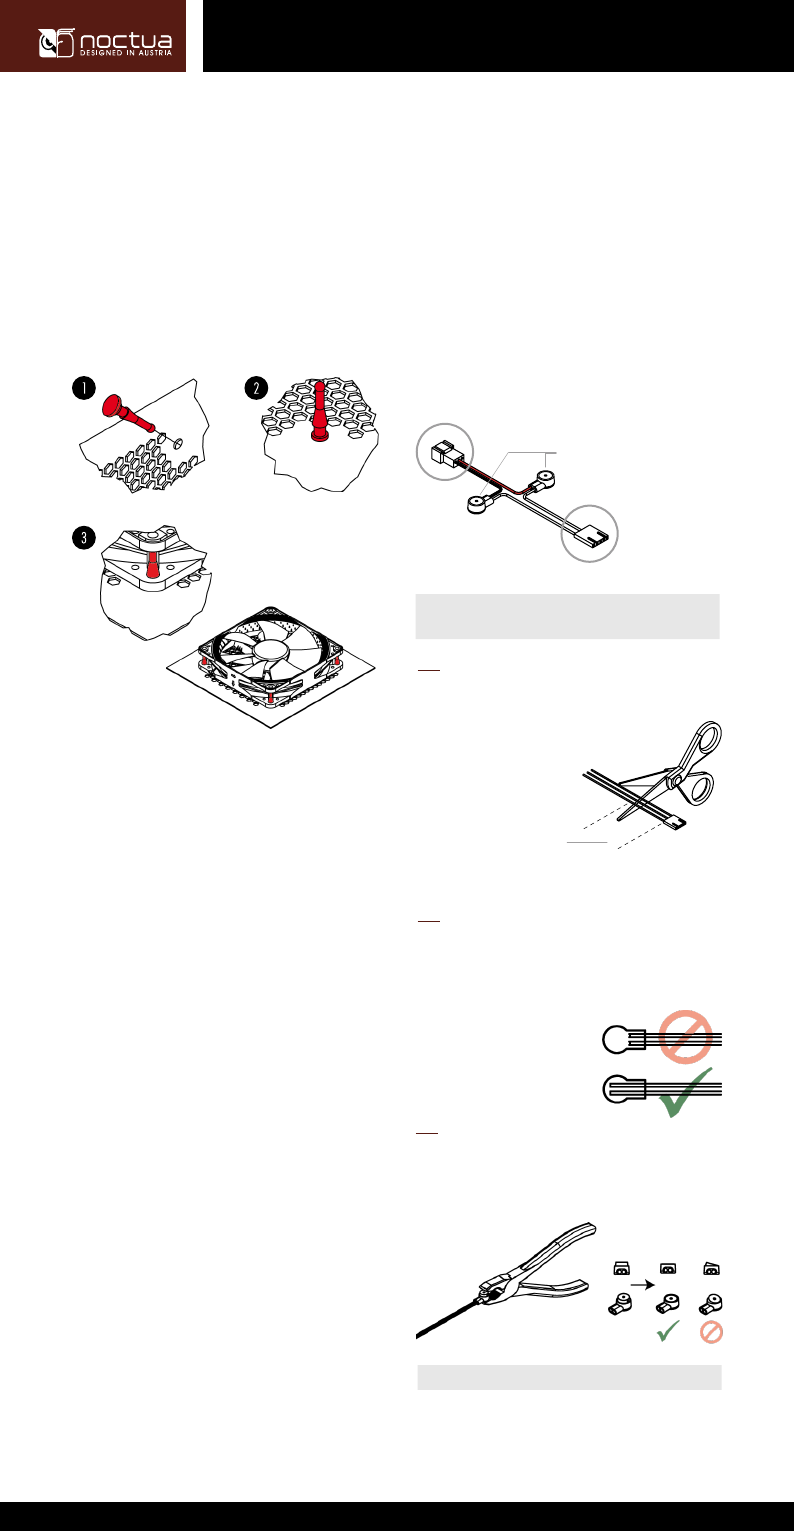
Installation
If you replace an existing 40mm fan with the NF-A4x10 in devices
such as storage or network solutions, it is usually best to use the
screws (or other mounting mechanism) used for the original fan.
When installing the NF-A4x10 as a case fan, you can either use the
supplied mounting screws or silicone anti-vibration mounts. In order
to install the fan using the silicone mounts, please first pull the sili-
cone mounts through the mounting holes of the case. Then put the
fan onto the silicone mounts and pull them through the mounting
holes of the fan:
Connection
The NF-A4x10 features a standard 3-pin fan connector. However,
please note that the fan can also be connected to 4-pin mainboard
fan headers. If you would like to connect the fan to a 2-pin fan hea-
der, please use the supplied 3:2-pin adaptor (NA-AC2). Please note
that there are different types of 2-pin connectors, so it is possible that
the supplied adaptor doesn’t fit. In this case, please use the supplied
OmniJoin adaptor set as described below. Note that the NF-A4x10
features an integrated polarity protection so there’s no risk of dama-
ging the fan due to reversed polarity. However, the fan will not work
when it is connected the wrong way around, so please make sure that
it is connected correctly when using 2-pin connections.
The NF-A4x10 features a short 20cm primary cable in order to help
you minimise cable clutter in typical applications. If you need a lon-
ger cable, please add the supplied 30cm extension (NA-EC2).
The NF-A4x10 comes with a Low-Noise Adaptor (NA-RC10) that
allows you to reduce the fan speed from 4500 to 3700rpm in order
to achieve even quieter operation.
NF-A4x10 FLX
|
User Manual
Cleaning and Maintenance
Fans inside computer cases tend to accumulate dust over longer pe-
riods of usage. In order to maintain maximum performance, please
clean your fans regularly using a duster, slightly moist tissue or
canned air. Please be careful not to use too much force in order to
prevent any damage to the fan. Please don’t use a vacuum cleaner as
this may apply excessive force to the fan. In order to ensure flawless
operation over many years of usage, the NF-A4x10’s premium grade
SSO2 bearing is fully sealed to prevent the entering of fine dust par-
ticles. Please note that the fan is not designed to be taken apart by
the user. Removing the impeller from the frame will break the sealing
of the bearing and results in a loss of warranty.
Using the OmniJoin adaptor set
The supplied OmniJoin adaptor set allows you to easily connect the
NF-A4x10 to proprietary fan headers if you want to replace a 40mm
fan in devices such as network or storage solutions.
Please first identify the individual leads of the OmniJoin adaptor and
the original fan. The OmniJoin adaptor uses black for ground (GND)
and red for +12V. The black lead of the adaptor has to be matched
with the original GND lead and the red adaptor cable with the original
+12V lead. Many fan cables use the same colours as the OmniJoin
adaptor, but please note that there is no guarantee for this, so make
sure to correctly identify the GND and +12V leads of the original
fan. Please refer to the manual that came with the device or contact
the device manufacturer if in doubt.
Step 1
Cut off the connector of the fan that was originally used in the de-
vice. Make sure not to cut the cable directly at the connector, there
should be least a 2-3 centimetres of cable left:
Note that it is not necessary to remove the insulation from the cables.
Step 2
Then take one of the supplied 3M Skotchlok™ connectors and
insert the GND lead of the original cable and the black lead of the
OminJoin adaptor into the two holes of the Skotchlok™ connector.
Make sure that both leads are fully inserted and pushed all the
way back.
Step 3
Then use flat nose pliers to push down the white button of the
Skotchlok™ connector. Make sure that the button is not jammed and
pushed all the way down. If the button is jammed, push it down from
both sides of the Skotchlok™ connector using the flat nose pliers.
After you’ve fixed the original fan’s cable to the OmniJoin adaptor
using the Skotchlok™ connectors, simply connect the NF-A4x10 to
the adaptor in order to use it in your device.
OmniJoin Adaptor
3M Skotchlok
TM
connectors
Connector of the original fan
+12V
GND
Make sure to correctly
identify the GND and
+12V leads of the
original fan!
2-3cm minimum!
Repeat Step 2 and 3 for the +12V lead.
 (2 Seiten)
 (2 Seiten)
 (2 Seiten)
 (2 Seiten)
 Manymanuals.com
 Manymanuals.de
 Manymanuals.fr
 Manymanuals.it
 Manymanuals.pl
 Manymanuals.cz
 Manymanuals.es
 Manymanuals-pt.com
Kommentare zu diesen Handbüchern